The easiest way to connect your users’ health data with your application or service
What is ZivaCare Connect?
Connect is the authentication widget that is embedded into your website or application. It allows your users to share their health data with your apps and services. After your user has successfully granted you access to their health data (using ZivaCare Connect), you’ll be able to query their data directly from ZivaCare API.
After the authentication process, each user from your app will automatically get a unique ZivaCare API account (you will pre-register these accounts on our system). This account will automatically synchronize all user’s health data from their disparate data sources.
To see how it works, click on the Connect Health Data button:
How it works
There are 3 basic steps to fully integrating ZivaCare Connect into your app.
- Create an application in the Developer portal.
- Add the “Connect Health Data” button to your application, and install connect.js on your site. You can read the detailed documentation on this here.
- Create a single server-side endpoint that will be responsible for getting the access_token for the user from the ZivaCare API server. Once this is complete you will be able to query ZivaCare API using the access_token.
Authentication flow
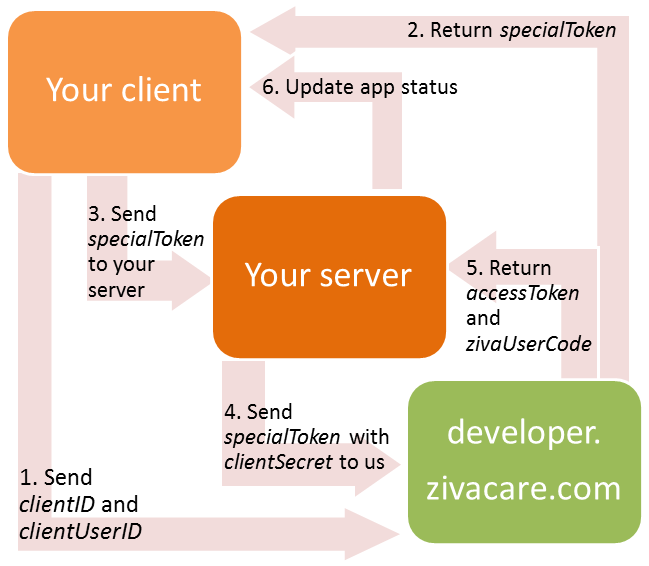
The ZivaCare Connect authentication flow consists of 6 steps:
- Your client will launch the Connect popup with two configuration parameters:
clientIdandclientUserId. - Once a user press “Finish Connecting Data” button you will receive a
specialToken. - Your client will send the
specialTokento your server. - Your server will add your unique
clientSecret(to thespecialToken) and will send it to ZivaCare. - ZivaCare will return:
zivaUserCode(ZivaCare unique ID for your user) andaccessToken. Save this data in your system. - Update your app status. You can now start using ZivaCare API for quering data.
